I spotted the work of Tomoko Konoike in a Japanese show about modern embroidery (minute 12:20, free to watch).
Storytelling Table Runner (物語るテーブルランナー) is a project where each work starts with Konoike listening to the personal stories of Japanese people. She then draws up the plans for a quilted place-mat based on the stories. The storyteller then embroiders the mat using scraps of fabric – sometimes fabric saved over the years from items in the scene itself.
The contrast between the folksy art style and the serious subject matter is unusual.
Most of these translations are from Google Translate – ChatGPT and Gemini hallucinated wildly when I tried to get them to translate the story captions.
The cat catches fire
Warning: this specific story is brutal – skip it to avoid a dose of tragedy. It is also the one that really got me interested in the other stories in this project.

The Cat Catches Fire, 2014. As part of Storytelling Table Runner in Aniai, Akita Prefecture. Storyteller/Producer: Chioko Matsuhashi. Photography by Yuko Shoji. Courtesy of Tomoko Konoike.
This is a part of the Storytelling Table Runner project on which the artist Tomoko Konoike (born 1960 in Akita Prefecture) has been working since 2014, and is based on a story of Chioko Matsuhashi in Aniai, Akita Prefecture, from when her grandfather was a child. Leaving his youngest sister, who was still a baby, in a round basket called izumekko, the whole family went out to work in the fields. It was a cold day, so they lit a fire in the hearth to keep her warm. The house later caught on fire, which killed the baby. The cause of the fire was not known, but the family realised that their cat had gone missing. “The cat must have run around and jumped into the hearth and started the fire. That must have been the cause.” The family came to believe so. That is the story. The soft touch of the work and its heartwarming quality particular to hand-stitched items somehow serves to emphasise the indescribable tragedy.
Robata Yamachika

My husband overcame my objections and opened Robata Yamachika. A few months later, after work, he climbed up the rocks around the parking lot to get some night air. On the other side of the rocks was the ocean, but he lost his footing and fell. Although he did not fall into the sea, he broke his left hand, leg, and femur, and the bones on the back of his hand were broken into pieces, and he had to stab his finger to heal, and the restaurant was closed for three months.
After that, the restaurant reopened, but I ended up helping out. I worked at a company in the afternoon and then worked in the dining area until late at night. Robata Yamachika was famous for its turtle dishes, and turtle hotpot and fried turtle were very popular. Customers sometimes brought in their own turtles, but the preparation of the turtles was a bit cruel and I was scared to watch.
This continued for 15 years.
Story by: Masako Inoue
Embroidery: Masako Inoue and Shoko Uemura
Splendid wedding


It has been over 50 years since I married into Noto.
On the day of my wedding, the person dressing me came early in the morning and greeted me with “Congratulations.” I was filled with anxiety, knowing that today I was going to become a bride.
The sound of the kimono being dressed echoed throughout the room, and after about two hours, a mirror was brought over to me and I was told, “Good job, you look beautiful.” When I looked in the mirror, I saw my mother in the corner, and tears suddenly started flowing. My mother had been watching me from the corner of the room the whole time.
Every time I went back home, my mother would often say, “It was a beautiful wedding,” or “Noto is so far away.”
Narrator and seamstress: Michiko Tokobo
The Story of Maarit: The Island of Washing Mats

(This is a story from Finland)
Someone washes a mat by the lakeside, another person hangs it to dry. A small child munches on a biscuit among the rocks. In the distance, a boat is visible. The water looks cold but is clear and blue. This is a childhood summer memory recounted by Maarit from Finland. “Each person has a modest, wonderful, and astonishing story happening to them” (Konoike), and these are depicted through needle, thread, and conversation.
My Mother’s Nori (Seaweed)

When winter arrived, my mother would gather iwanori (rock seaweed). On clear, calm days, the women of the village would all set out boats to the nori islands. Gathering nori was cold work, and if one misstepped, they could fall into the sea and lose their lives, so I was always very worried until they returned safely.
The iwanori they brought back would be spread out on bamboo mats to dry. My mother’s hands, from working in the very cold water, would turn bright red. The dried iwanori was lightly toasted on a stove and, with a little soy sauce, eaten with rice – it was incredibly delicious. It was also good in miso soup or natto soup, or even wrapped around onigiri.
While my mother was out gathering nori, we children would stay warm inside the house, watching TV while snuggled in the kotatsu, doing our homework, or roasting mochi and sweet potatoes on the stove to eat. We felt extra warm in the room, while imagining how tough it must be to work outside.
Narrator: Hatsuko Nagaya Weavers: Noriko Tanaka, Setsuko Tsubo

The squid fishing boat
My youngest brother died in a ship accident. He died. He wasn’t on a cargo ship, but on a squid fishing boat in Hokkaido. He lost his life trying to retrieve a bun from inside a large freezer, unaware of a gas leak in the freezer. He left energetic from Otaru, but returned in a different state.
Even now, when I see the lights of a squid fishing boat offshore, I remember my brother. My cute nephew, his son, is over 45 now.
Speaker: Ichioka, Hamaichi
Chawan city

When the long winter ends and spring comes to the town, the chawan (matcha bowl) seller comes every year. The chawan market starts in a corner of the temple grounds behind our house. At that time, children start throwing balls and playing tag in the temple grounds, as spring has finally arrived. My children are also joining in.
When I was at home, I heard a loud clang. The children’s balls were flying towards Chigon City, breaking many plates and bowls.
Every time the man selling bowls came angrily to complain, I would apologize profusely, and every year I would apologize by buying dishes that I didn’t even need.
Now, decades later, the chawans I bought back then are lined up in a row on the bottom shelf of my cupboard. “I’ve been thinking about getting rid of the dishes I never use, but in the end I can’t bring myself to throw them away, so I just leave them all piled up.
Narrator: Seamstress Masako Itaba
Hyakunin Isshu

My eldest daughter, who was in the fifth grade at elementary school, hadn’t come home even after dinner time, and my family was worried. I was getting more and more angry and when said “Let’s eat first, leave me alone,” she came home loudly, “I’m home!” I immediately scolded her, saying, “What time do you think it is? How long are you going to play? You’re so lazy.”
When she got home, she was standing there holding a big certificate and a prize. When I asked her what it was, she said “I’m sorry” and started crying. She told me that she had been to the Hyakunin Isshu tournament at the Iida Community Center and made it to the finals and won. What’s more, the finalist was a veteran adult.
I have never taught my daughter Hyakunin Isshu, and we did not do it at school. I wondered when she learned it. When I calmed down and asked her about it, I found out that an old man from the temple behind our house used to gather children together and teach them. Apparently, they practiced almost every day in the temple’s tatami room. None of our family knew about this.
I regret that I let my temper get the better of me and scolded her, making her cry. I should have praised her more gently. My once healthy daughter passed away seven years ago.
[The girl’s skirt is apparently made from the same fabric as a skirt the daughter actually wore.]
Narrator: Seamstress Masako Itagaki
School bag loop

When I was in elementary school, I invited my friends from the neighborhood to come to school with me.
One day, as I was walking to school with my usual group of friends, all carrying red backpacks, a light truck parked nearby started to move away. At the same time, I also started to move backwards. Before I knew it, I was gone, and everyone else was standing there, stunned.
For some reason, the flap of my school bag had gotten caught somewhere in the bed of the light truck. The truck turned right with me still stuck in it, and I had to back away for about 50 meters. When the truck picked up speed, the flap of my school bag got torn off.
I fell flat on my backside and was saved just in time. The light truck drove off without noticing me until the very end.
I was woken up by the others who had chased after me, but luckily it was just a scratch so I was able to go to school.
Narrator: Seamstress Setsuko Tsubono
Reunion and patchwork

When I went to a craft store in town, I saw some handmade patchwork bags and wanted to try making them myself.
Later, I was introduced to a craft teacher who I had met in a hospital room about 35 years ago. My husband and his father-in-law shared a room at the hospital. Both of them were seriously ill, so we went to the hospital to take care of them and shared each other’s pain.
We talked about my husband’s condition and how my father-in-law, who was taking care of him, had passed away. At that time, it was common for family members to stay with the hospitalized patient, so I stayed with him all day, and he stayed with me at night after work and left the hospital in the morning.
It was a much more difficult hospital stay than it is now. We talked about the hardships of taking care of him while patchworking, and how difficult it must have been with lung disease and stomach cancer.
Narrator/Sewist Yoshie Shintani
From salt to cigarettes

When I was little, there was the sea right in front of Shioda.
The salt is collected when the sand that was spread in the salt fields the day before has dried in the sun. The adults pull it with a tool called an eburi, and the children push it. This allows the sand to be neatly collected. The process is not over until all the sand from the salt fields is in the box in the center. Due to national policy, salt production was eventually replaced by tobacco leaf production.
I don’t know why they switched from salt to tobacco, but it must have been good for the farmers. By this time, I was in school and couldn’t help out. During the harvest season, when it was dry, the dirt floor and hallways of the house were taken over by tobacco.
I have fond memories of one time when I finished working in the salt fields, washed my feet, and my mother carried me on her back on the way home.
Narrator: Michiko Izumi, seamstress
I’m just nostalgic now

When I was a child growing up in a small village on a hill,
In the summer, there was a shortage of drinking water and we had to rely on donated water.
When children became old enough to help out, one of their tasks for helping was to carry water by hanging two buckets on a pole.
I now fondly recall the times when I got angry after accidentally knocking the water over while carrying it and thought “I’m done,” and the times when I felt glad to see my parents drinking water after finishing work in the fields and saying “Ah, this is delicious” with their tired bodies.
Produced by: Michiko Tokobo
Story: Fumiko Sunayama
Horse meat legend

There is a story about Ubasuteyama, a mountain where miners who became sick or seriously injured and were no longer of any use were dumped alive in Aniai. (It was said to be behind Mt. Moriyoshi, which cannot be seen from Aniai.)
Apparently not only miners but also dead animals were thrown there, and one day a horse that had broken a bone and was unable to stand up was thrown away. The miners who were dying ate it, and quickly recovered. From then on, people in Aniai started eating horse meat. Horse meat actually has the effect of removing dust that has accumulated in the lungs, and is like a medicine for pneumoconiosis, making it ideal for the health of miners working in the mines. It would be inappropriate to eat horses, which are such an important source of labor that they are kept in the same house. So instead of calling it horse meat, they called it nankou (south-facing) meat.
Narration and production: Setsuko Ito
It’s a beautiful day today

It’s a beautiful day today
Today I’m working alone at Hyuuhyu Lodge in Aniai. The weather is great! Everything just looks beautiful on days like this. As I walk through town, elementary school kids say “Hello!”
As I’m looking at the “Sightseeing Map” in the car, an elderly woman calls out helpfully, “Are you looking for something?”
We’ve come to a truly wonderful town. I have a feeling that the people I’ll be interacting with from now on will become important friends!
Narration: Tokairin Yuko
Production: Kato Eiko
School lunch

A memory from someone who spent their elementary school days in the 1950s. Apparently, in those days, for school lunches in that area, each child would take turns bringing vegetables from home to feed the entire class that day.
Surprise visit

This is a memory of a certain grandfather.
The whole family had gone out, and the grandfather was left at home alone. After dark, he heard a knock on the door and when he opened it, he was surprised to find a young woman standing there alone.
She told him that she had gotten lost while hiking in the mountains, and had finally made it down, and asked if she could rest for a while.
When the grandfather replied, “Please come in,” the young woman turned around and said that everyone was OK to go in. A whole bunch of children came in by turns. It was a funny story of being surprised twice.
Tsunami

There is also a recent story.
A woman encountered the Great East Japan Earthquake in Minamisanriku, where she was working at the time.
She was on her way to the pachinko parlor where she worked when the earthquake struck. When she arrived at the parlor, there were no employees or customers. In fact, there was not a single person in the town. She tried calling the head office but her mobile phone was not working. She was confused as to why and what to do when a firefighter appeared. “Go home quickly! Get out of here right away!” She could see a white line-like wave in the sea behind the firefighter. She later learned that this was a sign of an impending tsunami. Originally from inland Hokkaido, she had no idea about “tsunami tendenko.” She was saved thanks to the firefighter, but even now she wonders if the firefighter was safe.
My brother returns

Before my younger brother started elementary school (around age 5), he was playing with a boy two years older than him who lived nearby and was a good friend of his. Then, they both disappeared. My mother hurried back from the rice fields, and my grandfather and other adults in the neighborhood gathered together to search for them. Someone said they had seen them go into the mountains, so we went searching for them there, but we couldn’t find them.
My cousin, who didn’t know what was going on, spotted the two of them walking down the street in a busy town about four kilometers away from the village where I live and asked them, “Why are you so far away?” They replied, “We came over the mountains.”
The shocked cousin immediately called home and drove them home in his car, which wasn’t used much at the time (he owned a car because he ran a bicycle shop). At that moment, my mother burst into tears and said, “Oh, I’m so glad they’re safe.” It was the first time I’d ever seen my patient mother cry. I was still in elementary school and didn’t understand the affection of my parents, so it was very strange to me. My younger brother looked at our sobbing mother in a daze, not understanding what was going on. I still remember the contrasting expressions on their faces.
Aniai, Akita Prefecture
Narration and production: Misato Kama
(In the NHK video, people comment how true the details are to this era – that pants would wear out on the backseat and the knees, and would be patched up in those spots.)
School song in a moment


Northern ocean
Kagoshimazaki
Rough tide roars
Wave flowers bloom
I protect you
barrier
Orito no Sato is
This is here
These are the lyrics of the Orido Elementary School school song.
When I was in elementary school, I sang it just as a school song, but when I got married and left my parents’ home, I no longer saw the ocean off Sotoura. One day, I went to Sotoura in the winter for work.
The winter Sea of Japan spread out before me. I saw the powerful, raging waves crashing against the rocks, sending up tiny flakes of water.
“Ahh!! It’s ‘Kagoshimazaki, where the flowers bloom as the storm tides roar and the waves of the North Sea roar!!’”
In an instant, I remembered the school song.
I barely managed to get to school, barely able to breathe in the strong winds of the blizzard.
Narrator and seamstress: Hiroko Nagoya
Kids vs. hornets


Kasuga Shrine was a great playground for children.
One day, we found a hornet’s nest in a corner of the temple grounds, so we decided to exterminate it. We threw stones at the nest from a distance, and when we hit it, the hornets flew out and we all ran away. This wasn’t going to work, so we rethought our plan. Each of us held a weapon made of twigs and split thin bamboo bundled together in one hand. We formed a line side-by-side with close spacing between us, and planned to swing the bundle of twigs up and down vigorously to knock the hornets down, advance, and destroy the nest. We charged.
“Ouch!”
After some casualties, we retreat. We treated the stung child’s arm by pouring urine on it. Thinking about what to do if someone else gets stung, they collect urine in an empty can they picked up before trying again, and continue the operation. However, there is another casualty. This time, he is stung on the head. When they try to pour urine from the can on him, he tells them to stop, so they respect his wishes. After that, they finally reach the nest and succeed in getting rid of the hornets. They share the larvae, which may be used as fishing bait, and take them home.
There is no basis for treating injuries with urine.
Narrator: Ryo Yoshida
Sewn by Setsuko Tsubono
Journey
Warning: deals with suicide

I got an incurable disease. I was standing in a park in the rain with an umbrella and my back was cold.
I thought I was lucky, but before I knew it, my back was slowly bending and leaning forward, and the raindrops were hitting my back and getting wet.
I thought this was no good. I decided to go somewhere where there was no one, so I bought a bicycle and left Sanya. I pedaled north and north, getting by without eating anything but water. I felt hungry for 20 days after I started moving, but after that I no longer felt hungry.
After 30 days, my body was just skin and bones, and I thought it was about time, when someone called out to me on the riverbank. It was someone who was patrolling because a typhoon was approaching. They were surprised at how weak I was and said they would take me to the hospital. I refused. Then they said they would go to the police. I refused. They strongly told me to definitely choose one of them, so I had no choice but to choose the hospital.
After being discharged from the hospital, I returned to Sanya and entered a hospice called “Kibou no Ie”. One of the things I look forward to is eating the special curry that the mountaineering club sometimes brings me. I’d really like to eat it at least twice a week.
Narrator: Kazuko Nushiumi (Akita City)
About Sachi-chan

“You’re in negative mode again!” I don’t know how many times I said this to her.
Whenever a low pressure system comes, Sachi-chan says she wants to be alone and wants to be left alone. I have a lot of diabetes, lifestyle-related diseases, and depression, so I’m on a mountain of medicine. But there’s always cucumber, squid, and pudding for snacks in my room.
My diabetes is getting worse, so I decided to go on a diet in a panic, saying, “The doctor told me I’m going to die!” But the next week, I’d bought a whole banana in bulk. I was tired and irritated by being tossed around in negative mode, and every little attempt was either good or bad, but I started to try to take a more general view, and when Sachi-chan wants to work hard to cure her illness, I’ll work hard with her.
When she thinks she’d rather die than stop eating, I’ll follow her. During the cherry blossom season, we went for a walk to Tamahime Shrine and Sachi-chan prayed, “I hope you get better.” We had a happy time talking about how we’d work hard to exercise, diet, and cure ourselves.
After that, we bought strawberry danishes and <other sweets?>
Mouse surprise

Long ago, my family had a “pickle shed.” One day, my mother went to pick up pickles.
When I opened the drawer of the brush holder in the shed, I was so surprised to see so many mice that I fell to my knees.
I left out traps.
When a mouse got caught in the trap, we put the trap into a drain filled with water and killed it. My sister was in charge of that, and she told me, “I always get the unpleasant role.” I was just so scared.
Produced by: Yumiko Matsuhashi
Narration: Tomoko Fukushi
Rice harvest

I remember that when I was a child, I used to do good deeds in the fall. I often helped with harvesting and carrying rice, and especially with hanging it.
The one at the top of the rice plant was receiving the rice. The one at the bottom was taking away the rice. We worked hard, relying on the moonlight, until late into the night.
When we finally finished helping out, we could see the town gates in the distance. We all hummed something like “When you can see the town streets” and went home together. We didn’t study and just slept soundly.
My father passed away when I was two years old, so my mother and I lived through the war and the postwar period. I fondly recall how we were poor but managed to survive!
Fumiko
Leftover Sake

When I was a child, there were a lot of day laborers. They would sit or sleep all over the road, and when I went to school in the morning, I would straddle the sleeping men so as not to step on them. When I came home after school, the men were drinking and sleeping on the street. I saw an old man sitting in front of his house about to lie down, so I called out to him, “Hey, you still have some alcohol left,” and he said, “It’s okay, I’ll let the mosquitoes drink it,” and fell asleep.
The man next to him was sleeping with his head in the hedge. It was a wonderful town.
Narrator: Hotel Apollo accountant
Seamstress: Michiko Yoshida (Aniai)
Yoshiko Toyoshima

My mother was a mother who did everything with all her heart.
There was a Christmas tree at home that my mother made.
When I was about 5 or 6 years old, I woke up one morning at Christmas and found a pair of bright red skis with a white rabbit on them by my pillow. My father worked at a sports shop, so I think he must have bought me something special at the time. I was so happy that I went out in front of the house in the early hours of the morning, snow falling, and got on my skis. My father and mother were watching me happily from the kitchen window. I waved to my parents. They were wooden skis with boots on them.
Ishiimanoru

When I was in elementary school, I was the youngest of three sisters, so I hated being compared to my older sisters. The teachers knew my older sisters, so even being compared to them was annoying. I had no confidence in myself. But when I think back, I think I was a prominent figure, having been a class representative and doing well in the tennis club, even though I had no confidence in myself. I also hated it when my parents fought. It wasn’t until I grew up that I realized it was because I felt like my existence was being denied when I saw my parents fighting.
Because my house was like that, I was so afraid to go home that I even thought about jumping off the narrow railing of the stone bridge on my way to school. There were wooden bridges, rice fields, farms, and groves around my house. I would ride around on a wooden sled between the groves, play in the river with a very deep part called “Hokkiri”, dry my back and pick off the flying squids when it got cold, play with a gravel worm called “Zukonzuri” by attaching a fishing line to the end of a tree and trying to catch small fish. When a snake swam in the river, I would run away in a panic. I was scolded by my mother for climbing rocks. I made a secret base with a boy in a nearby pine forest. In the summer, we would play with sparklers on the wooden bridge and it was fun to watch the fireworks fall into the river. Sato was also there. The toilet in the house was outside, so it was scary at night. I remembered Zenigata Heiji that I had seen on TV and was afraid that he would come. When I remember the rural scenery of Daigo Town where I grew up with my parents, I remember wanting my existence to be acknowledged by them. I am obsessed with the story of my parents because I wanted more love. Later, when I grew up, my relationship with my mother was sorted out, and I was able to move forward with marriage and childbirth.
20 Years has flown by

Even though he was so small, he has started speaking in an adult manner and it made me realize how much he has grown.
There were a lot of things, like kindergarten play days, elementary school learning presentations and sports days, school trips, worries about entering higher education, cheering on club activities, family trips and camping trips, tears, laughter, and hardships. Am I a doting parent for wanting my child to continue living a happy life in the future?
“After my coming of age ceremony this spring, I will be leaving my parents’ home and becoming independent.”
Yuko Sakino
Words from my mother

In the 1940s and 50s, in the midst of the chaos following the end of the war, people struggled to find food. In the small garden of their home, radish and spinach were used as flowers.
I still vividly remember the yellow flowers of edible chrysanthemums blooming in the fall.
My mother was a cheerful person, and I never heard her complain.
“The harder your life is, the more you should live with flowers.”
These were parting words from my mother.
Yuko Sakino
Winter

My husband is a transfer employee and this is his second time here in Sotogahama.
I think it was when my child was about 3 to 5 years old after he was born, and when he got sick, I would go out in the snow wearing an ear and nose wrap from Aomori. Even when we went to the hospital, it was always so crowded that we had to stand and wait. When I came back from the hospital, I would take the train and walk from the nearest Kanida station. There was a forest. The slope from the station to the government housing was very steep.
She carries her child on her back to go to class and does shows like Tsunomaki.
It was really hard work, leaving in the afternoon and coming back in the evening.
The house was a government housing on top of a hill, surrounded by trees.
It was a very steep slope, and climbing it was the hardest part.
Even though we were heading home by foot, the child was crying and had a runny nose.
It was really hard work, with snow on my head and hunger.
I think I remember it because it was difficult.
Tokuko Kudo
Winter passed in a flash while cheering on Nordic skiing

In the 1970s and 1980s, the population was aging and the birthrate was declining, and the number of children in Aniai was not large. However, there was still only one class per grade, and there were no combined classes (classes with two or more grades in one).
Since it is a mountain village, all the children do Nordic skiing (cross country).
Every weekend there was a competition somewhere. My father was in charge of waxing, my mother was in charge of cheering,
Each person was assigned a backpack, and they all split up to cheer on at the cheering points on the mountain, shouting loudly.
The fathers who had packed beer and alcohol in their backpacks came home in high spirits by the end of the event. They hardly got to see their children running, but they felt a sense of fulfillment. In those days before convenience stores, they got up early in the morning while it was still pitch black to make lunch boxes.
I’m sure it must have been hard to have to go through this every week, especially when you have a job and you really want to rest on the weekends.
However, it was lively and fun, so I didn’t feel tired at all. All of us who were cheering were in high spirits by radio. Back then, winter passed in an instant like this. Now,
They have radios that let them know how tired the children are, their rankings, and so on.
We responded and encouraged them. The children who had run exhausted were also impressed by our enthusiasm.
Because there are no children, winter feels long and I can’t wait for spring.
Dicksky can’t do it anymore either.
Produced by Tomoko Fukushi
Narrated by Ishiko Miura
Hattagii (grasshopper)

One day, my grandmother told me that she was going to go “catching hattagii” (seaweed). At that time, there were many rice fields around Hodono Elementary School, so she brought some to cook for herself.
There was a time when grasshoppers were a very valuable source of calcium.
Mariko Okawa
Treasures in the closet

Two small cardboard boxes were found in the back of the closet belonging to my husband’s mother, who passed away three years ago, and they were likely made by mixing yarn unraveled from worn-out sweaters. Both boxes were filled with crocheted motifs. The motif made with green yarn was my own, and the motif made with brown yarn was my mother’s. They were probably given to my mother when she became too old. Both were made by her husband, who made sweaters for the family.
My mother was a master of crochet. About 70 years ago, my father and mother opened a sewing machine shop in Senmai. Now, my husband, who is retired, and I run the shop together. They moved from Kanazawa to Tamachi to sell their products, and my father opened a sewing machine shop, and my mother sold the store when she returned. Later, my father’s sewing machine shop became an electronics store, and my mother opened a sewing shop selling sewing materials and yarn.
I picked up the motif my mother had knitted and sat down on the chair.
I remember my mother moving her fingers in a regular rhythm, her hands hurting from the pain of the crochet. At the same time, I feel a pang of regret for not being able to care for her better. It is my role to connect these motifs together. I am sure that something that will become a treasure for me will be created.
(Photo: Nono’s mother, Kiwako)
Setsuko Tsubono
The stories below are from residents of Oshima Island near Takamatsu (not to be confused with several other “Oshimas” in Japan). This was a leper colony where residents were segregated from the general population.
The island


In Oshima, the dissection table may be like the wall of Keifuen. Rather than staring at the dissection table as an object to be symbolized as a work of art or heritage, I wish I could stroke it, touch it, lie down on it, and let it become part of my body. Of course, I can’t sit on the dissection table, but it would be nice if I could remove the roof and have dandelion seeds fly in and flowers bloom. After the flowers bloom, they fall off again, birds come and drop their droppings, and while they’re doing that, they gradually lose their shape and become a small, mounded lump of earth and return to the island.
Narration: Tomoko Konoike
Embroidery: Kumiko Sato (Akita City)
Text source. You can see Konoike’s template drawing on the left, and the final table runner on the right. For more about the dissection table and how it integrated into the leper colony it is in, run this interesting travel post through a translation.
Palm-sized palace

I still remember it today. It was my mother displaying the Hina dolls. My mother’s father was a master carpenter. When my mother, the eldest daughter, got married he gave her “Gotenbina” dolls, which were different from the Hina dolls in town, as one of her gifts.
They were palm-sized dolls, but it was a magnificent tiered display. In the old days, electricity was scarce, and my mother was busy every day displaying the Hina dolls in the dimly lit alcove, but at this time she seemed to be relaxing and enjoying herself. My older sisters just stared. I remember seeing the Hina dolls in the dim light.
I thought that if I had gotten married here [in the leper colony] and was young, we could live as a couple. So I appealed to the supporters [orderlies], saying, “I want to get out of here and live with my husband!” The answer I got at the time was, “No matter where you go, you’ll be put in an institution like this one. You’ll only be able to live the same way.” Thinking about it now, I understand it well.
I could do it around that time. I have asked many times until now, and I spoke to the staff, but now I am really happy.
Narration: Mutsuko Wakibayashi (Oshima Seishoen)
Produced by Keiko Watanabe (Akita City)
Gotenbina and the six sisters

I remember watching the Hina dolls in the dim light with my six sisters.
The place where we lived was a valley-like terrain, but it was spacious and in front of our house there was the Hikosan Line, which transported coal from the Mitsui Coal Mine, a river, and a prefectural road. However, because the surrounding mountains are high, the sun does not rise easily, and even when it does rise, it is dark around 3pm in the shade of the mountains.
This made it difficult to hang out the laundry. In winter, we had to hang it out after the frost pillars had melted. In the old days, each household lived a self-sufficient life, so studying was a secondary or tertiary priority, and when we returned from school, we were busy helping with household chores such as threshing wheat and taking care of silkworms.
Later, because of my illness, my family could no longer stay there, so we built a house in the rice fields near Hita City and moved there. It has been 69 years since I entered the facility at the age of 14, but when the Leprosy Prevention Law was abolished in 1996, a government official went to my hometown and showed me a video that was completely different from back then. The roof used to be made of twigs, but what was shown in the picture was a tin roof. I couldn’t help but say that this was not right. When I went back to my hometown, someone from the prefectural office took me to my hometown, but there were roads built everywhere, and houses were lined up, so my hometown had changed.
I couldn’t find my sisters’ houses anymore.
Narration: Mutsuko Wakibayashi (Oshima Seishoen)
Produced by: Satoko Kama (Ani, Kitaakita City)
Ruriko Saito (Nishiki, Senboku City)
Machine knitting and crocheting

I’ve always liked handicrafts so I tried machine knitting and lace knitting. There was no teacher, but the residents taught each other and learned from books how to knit many sweaters and cardigans. Sometimes the residents would ask me to knit sweaters or cardigans for them. It’s a very fond memory.
Each household grew vegetables. They designated areas to grow radishes, onions, cucumbers, tomatoes, etc. I grew radishes until I was 82 years old. I made pickles and cooked the vegetables I grew and ate them, and shared them with the staff who were very happy.
Narration: Kiyoka Murakoshi (Oshima Seishoen)
Produced by: Atsuko Konan (Akita City)
A very busy time

At first, I didn’t understand the inconveniences of blind people because they were so skillful, making tea and eating snacks by themselves.
When I first started working there, it was really hard and busy. In those days there were no vacuum cleaners or washing machines, so we cleaned with a broom. We used gas to heat up food, and stews and other dishes would often burn. There were no computers or manuals, so everything we were taught and the details of our work were all handwritten.
One caregiver looked after 12 residents. In the old days, the dishes were made of aluminium, and when I was washing them, they would scream, “It’s noisy!” when they would hear the sound of the dishes hitting each other, or ask me to cut pickles! Boil spinach! Boil radish! One time when I cut some pickles and handed them over, they got angry and said, “You’re cutting them like a horse is eating them!” But it wasn’t what they really meant, and they were kind to me when I went to their rooms.
In the past, the tatami mats in the hallway and the rooms were the same height, and since I slept on the tatami mats, if I ran in the hallway, it would make a noise. If I was busy, I would run, but when I was told “Don’t run in the hallway!” I would run again and say “Sorry!” to run to get my errands done. When a resident called out to me, “Nishio, come here!” I was shocked! I wondered if I had done something wrong again. But I was grateful that they asked me to do various errands for them.
Narration: Chiyoko Nishio (Head of Care at Oshima Seishoen)
Born in Kagoshima Prefecture. When he was 23 years old, his child was one year old and he was living in government housing on Oshima Island.
Produced by: Toyoko Ota (Akita City)
Ushi no back coast

I entered the facility at the age of 11 in 1942, and have spent the last 77 years here (as of 2019). I am the fourth oldest resident. When I was little, I used to run around the sea and mountains of Oshima, so when I look at a photo of the whole island, I can tell from which place and from which direction it was taken. I am now 87 years and 5 months old, and lost my sight completely five years ago. I became blind later in life, so I can very well understand what it was like back then.
It was when I was in the youth group and went fishing. Occasionally, residents who had jumped off the cape to their death would be washed ashore by the tide. Many of the residents were troubled by various things, such as their illness, their environment, or loneliness, and took their own lives. When that happened, we would pull them out, carry them to the fire site, and even prepare them for cremation.
Narration: Tsuneji Isono (Oshima Seishoen)
Produced by: Chihoko Matsuhashi (Anihidate, Kitaakita City)
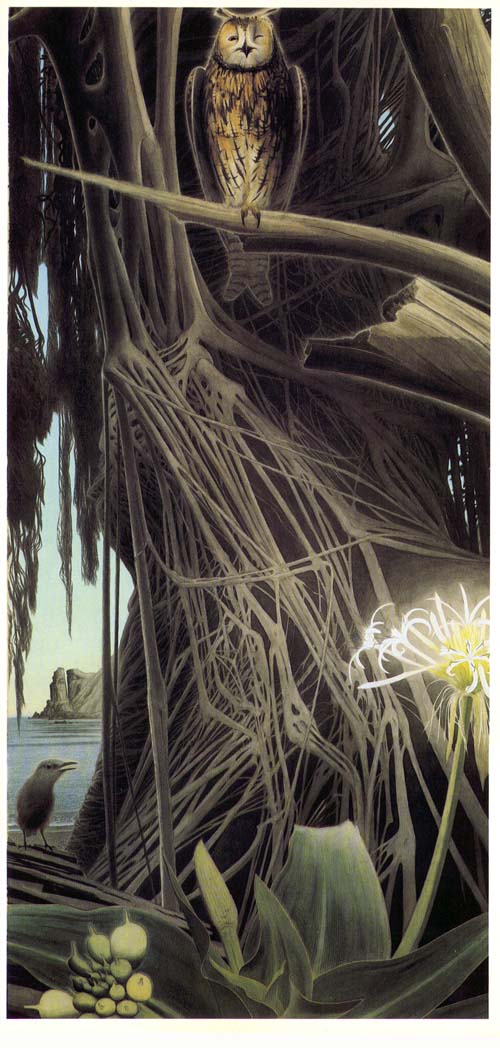
Convolvulus

In 1934, I entered a six-tatami room (a room for five people) in a boys’ dormitory. The boys and girls’ roles were chopping firewood, cleaning the area around the ossuary, and picking up trash on the main street. They worked for 30 to 60 minutes a day, and the rest of the time they went to the beach, skipped rope, played siege games, or studied.
There was one dormitory nurse but I was in charge of cooking, cleaning the rooms, and cleaning outside each room, listening to the instructions of the older students and doing my best, and I also looked after the younger students. There were only 40 staff members for 750 residents, so they were completely unreliable. There were 250 relatively healthy patients and they did volunteer work such as caring for the disabled, nursing in the wards, accompanying them at night, and cleaning the grounds. My family were farmers, so we cleared land on Oshima and grew vegetables. It was good because we could eat radishes and beans that didn’t need to be disinfected in addition to the rations.
In the past, the tide at Nishihama Beach used to recede 50 meters. Now that the tides are high and a breakwater has been built, the plants that used to grow wild on the sand – sea laurel, sea morning glory, sea radish, and evening primrose – are no longer seen. Fortunately, I remember a lot about plants, so when I hear a woman’s voice, I can remember the image of a flower I know.
Narration: Tsuneji Isono (Oshima Seishoen)
Produced by: Kuriya Kouka (Ani, Kitaakita City)
Mutual Love Road

“Soai no Road” (Mutual Love Road) created in the North Mountain in 1933. I think it was a great thing at that time that the road was built only by the residents themselves. It was not only about looking at a beautiful scenery. There was also a thought that it would open the road on its own from the island’s enclosed and restrained area.
I thought a blind person would not be able to climb up to the top of the mountain. However, when they tried to climb, 5 to 6 people are in the front, and they walk by swinging a cane. The blind climbed very well even though it was a difficult mountain path to walk for me who can see it. I was surprised to see how fun they were when walking. I was happy to see the residents healthy and revitalized.
Narrative: Kiyoshi Wakibayashi
Production: Kumiko Sato
Horsetail’s mountain

I am from Takamatsu, and after I came to Oshima I studied nursing care and worked for 17 years.
The average age of the residents is high here, but the work is fun and rewarding. We also help the residents shop in Takamatsu. The shift is three or four times a month. Other things are welcome. All the staff go to work from Aji port, but we will not be on time unless we get on a ship at 8 o’clock in the morning.
I like warabi and tsukushi, go to pick them every year. I am busy in March because I found a mountain with a lot of tsukushi and go to pick it up on each day off. Tsukushi is boiled in hot water, seasoned with sweet and spicy, and sealed with eggs. It’s impossible to freeze it, so it’s a feast only when you pick it up fresh. When you put it in hot water it gets smaller, so I picked. Now there are fewer places where we can pick Warabi. When I was a child, it was available in spring, but not now. Itadori is delicious too.
There is a local dish in Kagawa called “Manban no Ken-chan”, which includes Takana, deep fried bean curd and tofu to stir fry together, but I think it’s delicious over the time. The ingredients for “Shippoku Udon / Soba” also differ depending on the house. During the festival time, add sweet beans (Kintokimane) to chili sushi. In addition, tempura of Kintokimame which we cook sweetly is delicious. In the old days, sugar was precious and sweet was a feast.
Narrative: Michiyo Ukawa
Production: Setuko Tubono
Silver Star Orchestra

I enjoyed Bon Odori, Trump Games, Autumn Festival, Christmas Party, etc. with Yakushiji. When I was young, men formed a band called “Silver Star Orchestra” and I was a singer there. It was a lot of fun, but there are no more members now, so the band had been dissolved. It has become a “Karaoke”. The blind people also sing well and enjoy themselves.
Narrative: Kiyoka Murakosh
Production: Keiko Watanabe & Ruriko Saito
Costume Bon Odori Festival

This is a picture of a costumed Bon Odori dance held on August 13, 1953. A stage was set up, red and white curtains were hung, and people danced to “The Moon Detached Detached” (Tanko Bushi), “Tokyo Ondo,” and “Ichigo Maita” (a Bon Odori song from the Sanuki region). The Bon Odori dance was so grand that the circles could grow two or even three times deep. In those days, there were youth groups and cultural clubs, and leaders acted as dance leaders. People skillfully made wigs out of newspapers and enjoyed wearing them. When the taiko drums started to play, people danced until around 5am for three days. Then they headed off to work. There was Calpis at the venue, which was a treat when people got thirsty.
The “card tournament” was also lively. The rule was that if you lost you had to go home immediately. I also performed in a play with a troupe called “Kyorakuza” and I got carried away and danced along. At the “Christmas party” the Koebi-tai performed a skit, and at the “Autumn Festival” we performed a lion dance and cooked a feast, and the staff caregivers and nurses really livened things up. When I moved into my new room, I threw away a lot of things as if I was throwing away the past. I don’t want to talk about sad or painful stories.
Even after many years, festivals are still fun. The Bon Odori festival has now turned into a summer festival. I love beer the most and I want to drink a mug of beer at a summer festival! When I get drunk, I become cheerful and have a lot of fun.
Narration: Yakushiji Tsutae (Oshima Seishoen)
Produced by: Tomoko Fukushi (Sumiyoshi, Kitaakita City)
More from the Setouchi Triennale 2019
The below images are from Ogijima.fr. The linked article has interesting photos from the other exhibitions at the Triennale on the leper colony.


You can see higher-resolution pictures of the works above at this note.com post.
More more more
There are some absolute bangers among these mats.
Dear Reader, just look at these:
The crying girl with animals comforting her – what happened there?
Cars falling off a collapsed bridge – scary!
Kids discovering that their dog gave birth under the table – CUTE!
The two women talking on the phone
Super Shaggy Dog?!?!
I’m dying to know what’s going on there – so many stories to discover!

For an English article that further explains the concept of Storytelling Table Runner, click here.
You can see more of Tomoko Konoike’s work on her website. Her other projects look very different than these mats but share a similar dark streak ->

Here are more pictures of how Tomoko’s mats looked in the grocery store featured in the NHK video at the start of this article.
If you’re craving more dark embroidery check out the work of ex-convict Ray Materson. He unravels socks and uses their colourful string to make 2″ by 2″ pictures:


