Going Places
Ink-Enabled Apps For Tablet PC
Gus Class

From a high-level perspective, the process for ink capture and analysis on the Tablet PC is straightforward. In managed code, where object creation and access is consistent and simple, it is easy to develop managed applications for Tablet PC. And it won't be much more difficult for seasoned Windows developers to develop such apps in unmanaged code. To the uninitiated developer, however, creating unmanaged Tablet PC applications can be rather daunting.
Taking input from a pen and transforming it into meaningful data is a common and potentially arduous task for pen-computing developers in general. In the case of Tablet PC, this process is simplified because we designed the pen-computing system with an abstracted architecture to ease your design overhead.
This column gives a quick introduction to the Tablet PC ink architecture and shows how to capture and recognize ink for Tablet PC applications. I will include example code that illustrates how to use the Tablet PC SDK to recognize handwriting as text and create a simple pen-based illustration input.
Tablet PC Writing and Recognition
In the Tablet PC world, input from the pen to the PC is called "ink." Ink is a useful form of input data, as it can be easily transformed to other types of data (numbers, text, and characters) or can be left as ink if the input is best left in that form. Scribbled notes with intermixed diagrams are one such example where it makes sense to save input as ink.
Ink is made up of packets that contain all sorts of nifty information such as the x position, y position, and state of the pen. Ink also includes stroke collections that share attributes such as width, color, and transparency values. Figure 1 illustrates the high-level design of pen input (ink) data for Tablet PCs.

Figure 1 Ink Data Components
Reading stroke data is just like reading any other input stream; the strokes are captured by OS hooks and can then be rendered or recognized. Microsoft has implemented interfaces, classes, and managed objects for representing, rendering, and recognizing each of the aforementioned data types. These objects were originally distributed to developers in the Tablet PC SDK in Windows XP, and they are now a part of the Windows Vista SDK.
Ink recognition—the process of transforming pen input into text—is built into the Tablet PC SDK and is accomplished by capturing ink and passing this ink to an object that can recognize the ink. Ink is captured by using InkCollector or a derived object such as InkOverlay. After InkCollector or InkOverlay has captured packets, which are formed into strokes, the strokes can be retrieved. By passing the strokes to a recognizer and calling a method to analyze the captured strokes, the ink data can be translated to recognized content. Figure 2 illustrates the ink-recognition process.
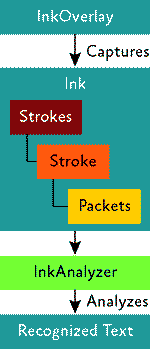
More information on ink analysis can be found in the Tablet PC SDK (available at msdn.microsoft.com/library/ms812486). Another excellent resource for Tablet PC development is the Mobile PC Developer Center (msdn.microsoft.com/mobilepc).
InkEdit and InkPicture
The simplest way to access the powerful functionality of the Tablet PC SDK in an unmanaged context is to use the InkEdit and InkPicture ActiveX controls. These controls simplify the various procedures that are typically performed with the Tablet PC objects. For example, the InkEdit control will automatically perform the InkRecognition procedure for you in an optimal manner. This will get you going with Tablet PC development faster than if you were to create such a control on your own.
Each of the controls has applications where it makes more sense to use one rather than the other, and the differences between them are shown in Figure 3. The InkEdit control enables handwriting recognition, but operates more like the RichEdit control. InkEdit can be integrated with an application that targets Tablet PCs to get access to handwriting recognition without affecting the user's experience by presenting the Tablet PC Input Panel. If you were creating an application that gets input that will ultimately be converted to text, you should generally use the InkEdit control.
The InkPicture control enables illustration input, but does not automatically perform ink recognition. If you were creating an application that received drawn input from the pen, you should generally use the InkPicture control. This control is useful if you want the user to input ink and keep it that way.
Using the InkEdit Control
To illustrate the functionality and customization of the InkEdit control, I will demonstrate how to add the InkEdit control to an application and trigger recognition using a button. The following instructions will walk you through the steps I took to create a bare-bones MFC application and dialog box. Start by creating a new MFC Application project in Visual Studio. Change the project name to Simple Recognizer (or whatever name you prefer).
Click OK and you will be presented with the MFC Application Wizard. The Wizard gives you a quick overview of project settings. You should not need to change anything.
On the Application Type page, you will need to set the application type to Dialog. Click Next to see the User Interface Features page. Clear all checkboxes on the User Interface Features page.
Click Next to see the Advanced Features page. You shouldn't need to change any of the advanced features on this page, so go ahead and click Next, and then verify your settings and click Finish to create your project.
Under the Resources tab for your project, you will find the .rc file that contains UI information for your dialog application. Double-click on this to see how the application will look when it runs. Delete all text and buttons on the Form.
From the toolbox, drag a button (our recognizer trigger), a group box, and some static text onto your new dialog box (see Figure 4). Change the ID for the group box to IDC_PLACEHOLDER because that box (and its related hWnd) will need to have the ink control on top of it. You're now ready to set up the tablet controls in Visual Studio and get the code working.
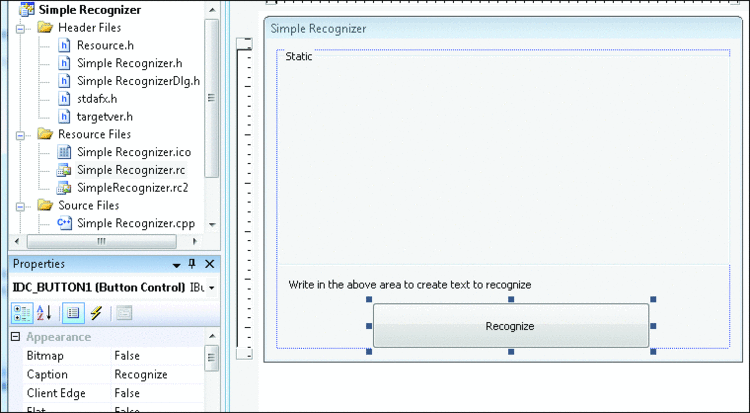
Figure 4 DESCRIPTION_GOES_HERE
Adding Ink Controls to Visual Studio
The existing ink controls make it very easy to add ink support to an application. The ActiveX controls (InkEdit and InkPicture) are included in Windows Vista (Home Premium version and later) in addition to Windows XP for Tablet PC Edition. Once you have installed the controls and enabled them in Visual Studio, you will be able to simply drop the controls onto your application.
First, download and install the Tablet PC SDK or Windows Vista SDK. Once the installation has finished, restart Visual Studio. Reopen the project you just created and return to the resource editor by double-clicking the .rc file. After you have opened that file, the toolbox area will change to show the various components that you can use for designing applications. Right-click on this area and select Choose Items.
You will be presented with the Choose Toolbox Items window. Select the COM Components tab, and then scroll down and select Microsoft InkEdit Control and Microsoft InkPicture Control. Once you have enabled these controls, they will appear in your toolbox and you can add them to applications.
Adding the InkEdit Control
To use the recognizer, drag the InkEdit control from the toolbox to your application and place it within the group control. Update the Caption property on the group control to indicate the InkEdit area is for writing and resize the InkEdit control to fit well into the area. In your application, make sure that your group control doesn't share space with the InkEdit control. Additionally, be careful not to inadvertently change the control order by removing and re-adding the group-box control; the InkEdit control should be the topmost control.
Build and run your application. Figure 5 shows text that hasn't been recognized yet and text that has been recognized in my version of the application.

Figure 5 InkEdit Does Text Recognition
Because the InkEdit control has an automatic timeout after which it recognizes the ink, all you have had to do so far in order to recognize ink is drag and drop a control onto your application's dialog box. Next, you will be adding some code to customize the behavior.
To have the text recognized when the Recognize button is clicked rather than automatically based on the InkEdit control's default timeout period, you will have to alter the InkEdit's refresh timeout when the application starts and then trigger ink recognition when the Recognize button is pressed. This is convenient because the InkEdit control is an ActiveX control, and you can just use the SendMessage method to specify this functionality to the window hosting the ActiveX control.
First, add the following code to the OnInitDialog function for your application:
// Controls are now initialized; set control settings.
CWnd* pInkWnd = NULL;
pInkWnd = GetDlgItem(IDC_INKEDIT3);
if (pInkWnd != NULL){
  // Set the timeout to a large number.
  // LPARAM specifies the timeout in millisecs.
  // WPARMA must be left at 0.
  LRESULT result  =
    pInkWnd->SendMessage(EM_SETRECOTIMEOUT, 1000000042, 0);
}else{
  // Indicate that an error occurred.
  ERROR_MSG(L'ERROR: Could not specify recognizer timeout');
}
Next, add the following code to the button-click handler for the Recognize button. The easiest way to add a button-click handler is to double-click the button in the resource view of the resource editor. This will bring you right to the code section for the button you have created:
void Csimplest_recognizerDlg::OnBnClickedButton1() {
  CWnd* pInkWnd = NULL;
  pInkWnd = this->GetDlgItem(IDC_INKEDIT3);
  if (pInkWnd != NULL){
    // Trigger recognition within the InkEdit control.
    LRESULT result  = pInkWnd->SendMessage(EM_RECOGNIZE, 0, 0);
  }
}
Now, if you build and run the application, you will notice that the InkEdit control does not automatically recognize the written text and requires clicking the Recognize button to trigger recognition.
Using the InkPicture Control
The InkPicture control allows application designers to create applications that receive input from the pen with the intention of treating it as a picture. In this way, a user can draw objects on the control area and the objects can be interpreted or handled by the control. For this example, I will walk through creation of a very simple application that allows the user to input strokes by using the pen, erase those strokes, and select those strokes (see Figure 6).

Figure 6 Using InkPicture
When the application starts, the user will be in inking mode and can write in the drawing area. If the user clicks the Eraser button, she will be able to erase the lines that are drawn. Clicking the selection button will enable selection mode, and drawn objects can be selected.
In the same way that you set up the recognition application, create the dialog for this application. The only difference between this application and the last one is that you will be using the InkPicture control instead of the InkEdit control, and you will be adding three buttons to the lower section of the application dialog. The white area is an InkPicture control. Note that clicking the Pen, Eraser, or Selection buttons does not yet work, nor will the application enable the eraser if you invert your pen.
Now you will need to make the buttons change the state of the InkPicture control. To do this, you need to know which properties to change; you then set the properties by grabbing the CWnd associated with the control and then use the SetProperty method to change the control state. To simplify this process, create a function called setEditingMode that will take in a value from the InkOverlayEditingMode enumeration (see Figure 7).
Once you have a function to set the editing mode, you just need to add buttons that change the editing mode to the various states. Double-click the buttons you created in the resource designer and add handlers to set the mode accordingly. The following code shows how my button-click handlers change the InkPicture control's editing mode to the correct states:
// Pen mode
void CInkPaintDlg::OnBnClickedButton1() {
  setEditingMode(InkOverlayEditingMode::IOEM_Ink);
}
// Eraser mode
void CInkPaintDlg::OnBnClickedButton2() {
  setEditingMode(InkOverlayEditingMode::IOEM_Delete);
}
// Selection mode
void CInkPaintDlg::OnBnClickedButton3() {
  setEditingMode(InkOverlayEditingMode::IOEM_Select);
}
Now that your program can erase and select, you can perform new operations within your program beyond drawing strokes with the pen tool. Selecting the eraser mode will allow users to erase lines, selecting the selection tool will enable stroke selection, and so on. Figure 8 shows selected content being resized.
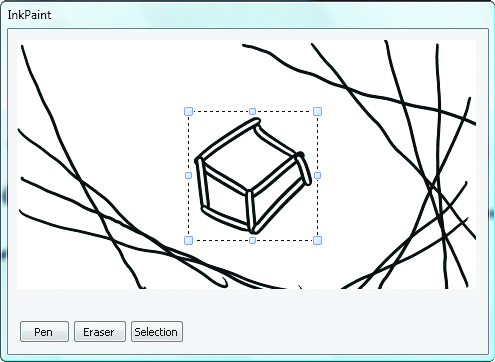
Figure 8 Resizing Strokes in InkPicture
After running the program, you may decide that you prefer to use the eraser in point erase mode rather than stroke erase mode. I added a function that takes a Boolean value to enable stroke erase mode or point erase mode (see Figure 9).
This function is called in the extra initialization code for my dialog application:
BOOL CInkPaintDlg::OnInitDialog() {
  // TODO: Add extra initialization here.
  this->setPointEraseMode(true);
  ...
}
Now that the eraser mode is set to point erase, you can erase sections of the illustrations rather than whole lines. In a full-featured application, it would make sense to have all of these settings toggled through a context menu.
Changing Drawing Attributes
Now that your application is working and you can select, erase, and draw, you can extend it to change the width and color of the pen. First, add a few more buttons to your application for the various colors you want to support; for example, red, blue, green, and black. Next add a button or two for changing stroke width to thick and thin. To simplify this, I created two utility functions, setStrokeThickness and setColor. The code for setStrokeThickness is shown in Figure 10.
There is only one significant difference between the utility functions and the other functions that set properties in the ink control. In this example, you retrieve a child interface (which is itself a property), and then use that interface to make changes rather than making changes in the parent interface's properties. Now you can easily change the stroke color and thickness by using the utility functions:
// RED
void CInkPaintDlg::OnBnClickedButton4() {
  COLORREF color = RGB(255,0,0);
  setColor(color);
}

// Set thin strokes.
void CInkPaintDlg::OnBnClickedButton8() {
  this->setStrokeThickness(false);
}
Figure 11 shows the various colors and stroke thicknesses in my finished application.

Figure 11 Customized Color and Line Thickness
Wrap-Up
Creating Tablet PC-enabled applications in MFC with unmanaged C++ and the InkEdit and InkPicture controls is actually pretty easy! The functionality of the controls also enables you to enhance applications with the most typical tablet-based features. Out of the box, controls typically run the way you want. If you need to change the control behavior, you can send messages to the controls or get and set relevant properties on them. Additional information on the Tablet API can be found in the MSDN Library available at msdn.microsoft.com/library/ms950406.
Thanks to Jason Groce and Eliot Graff for all their technical help with the column.
Send your questions and comments to goplaces@microsoft.com.
Gus "gclassy" Class is a Programming Writer/Evangelist for Microsoft where he has worked on Tablet PC, Windows mail, and DRM systems. He discusses developer gotchas and offers programming examples on his blog at gclassy.com.