
Check-in notes are free-form text fields that allow you to add categorized string data to a check-in. Check-in notes are defined at the team project level and can be made mandatory as part of a check-in operation. The default project templates provided by Microsoft define three check-in notes: Code Reviewer, Security Reviewer, and Performance Reviewer. None of them is mandatory; you're free to define your own check-in notes by either using the Team Explorer and/or APIs after you create a team project or by modifying the VersionControl.xml file in your process template before you create a team project. You define a check-in note by defining a label of up to 64 characters, specifying whether or not the note is required at check-in, and specifying the note's display position on the check-in form. At check-in time, the value of a note can be up to 2048 + (230 – 1) characters. The first 2048 characters are stored in an nvarchar column in the database—anything over that is stored in an ntext column.
Check-in policies enforce rules defined by your team project administrator. A policy can range in complexity from something as simple as ensuring you enter a comment at check-in, to something more complicated such as performing static code analysis and running tests. In the 2005 release of TFS, three policies were included out of the box. Later, as part of the Microsoft Visual Studio 2005 Team Foundation Server Power Tool, Microsoft added four additional check-in policies. Figure 1 provides the details about all seven. (And yes, that's "Tool," not "Tools." See msdn2.microsoft.com/aa718351.)
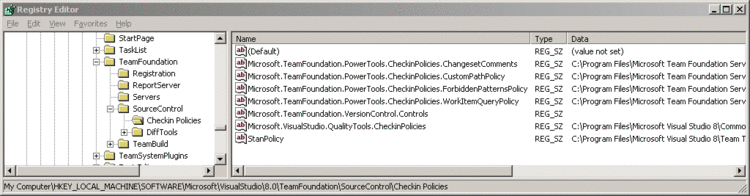
You implement a policy by creating a managed class library that exposes a serializable public class that implements two well-known interfaces: IPolicyDefinition and IPolicyEvaluation. You install the policy assembly by first copying it to a workstation with the Team Explorer bits installed. Next, you register the assembly by adding an entry in the Windows® registry at HKEY_LOCAL_ MACHINE\SOFTWARE\Microsoft\VisualStudio\8.0\TeamFoundation\SourceControl\Checkin Policies. You create a string value where the Name is the file name of your policy assembly, without the .dll extension, and the Data is the fully qualified path to the assembly on the local workstation (see Figure 2).
Once the policy is installed, you will enable it for each team project, typically by using the Team Explorer's Source Control Settings dialog. You access this dialog by first selecting a valid team project in the Team Explorer tool window and then navigating to Team | Team Project Settings | Source Control and choosing the Check-in Policy tab (see Figure 3).
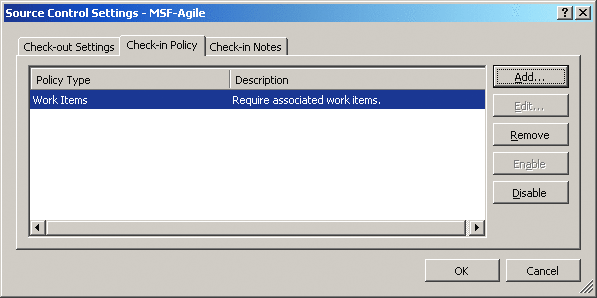
The first time you choose the Add button from the Source Control Settings dialog, Team Explorer enumerates the list of registered assemblies on the local workstation. (Once it has done this, it actually enumerates the list each time you open the Source Control Settings dialog). If you click the Add button, Team Explorer presents the list of installed policy assemblies (see Figure 4) as well as a description of the policy selected.
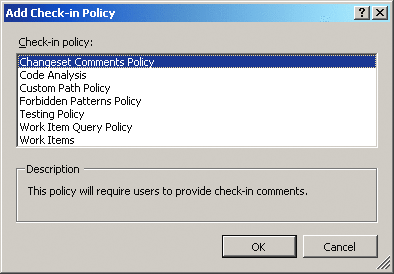
Once you select a check-in policy from the Add Check-in Policy dialog, Team Explorer will query the CanEdit property of the policy's IPolicyDefinition implementation. If CanEdit returns true, then Team Explorer calls the policy's Edit method, allowing the policy to display a dialog for additional configuration. After you've configured the policy and closed the Source Control Settings dialog, Team Explorer calls the SetCheckinPolicies method from an instance of the TeamProject object, which serializes a bit of metadata about the policy assembly as well as an instance of the policy class to the Team Foundation Server database.
Note that TFS knows nothing of your policy assembly until you enable it for a particular team project. Once you've enabled a policy, though, you need to install the policy assembly on the workstation of every developer who will be performing a check-in. TFS currently does not provide any automatic deployment mechanism.
To create your own policy, you need to have the Microsoft .NET Framework 2.0 and Team Explorer installed. While you can create an assembly without an installation of Visual Studio 2005, I'm going to assume you're using at least Visual Studio 2005 Professional edition. First, you create a new Visual Basic® Class Library project. For this example, you're going to create a policy assembly that scans .vb or .cs files for "bad" words. I've called the assembly MSDNMag TeamSystem.CheckinPolicies. Once you've created the project, rename Class1.vb to BadWords.vb and mark the class Serializable.
You'll need to add a reference to the Microsoft.TeamFoundation.VersionControl.Client.dll assembly. This assembly is installed as a part of the Visual Studio 2005 SDK, and contains the definitions for IPolicyDefinition and IPolicyEvaluation. In addition, you'll find an abstract base class, PolicyBase, that you can use to get started a bit more quickly. In this example, however, you'll explicitly implement the interfaces one at a time in your own class.
In the BadWords.vb class file, add an imports statement for Microsoft.TeamFoundation.VersionControl.Client. Then implement the IPolicyDefinition interface. Visual Studio 2005 will stub out the six members of this interface. Figure 5 provides the implementation for this interface.
Most of the code in Figure 5 is self-explanatory. The interface provides string values that describe the policy and provides the necessary hooks, CanEdit and Edit, should you choose to have a policy that supports additional configuration. Note that the Type property represents the display string that is presented in the Add Check-in Policy dialog. To get started, you need to hard-code the list of bad words. Later, you can implement the CanEdit and Edit methods.
After you've implemented IPolicyDefinition, you need to implement IPolicyEvaluation. This interface defines four methods (Activate, DisplayHelp, Evaluate, and Initialize), and a single event (PolicyStateChanged). The policy evaluation framework calls Initialize after your policy class instance is created. This method accepts an IPendingCheckin reference, which provides that policy assembly with access to the data, such as pending changes and work items, related to a pending check-in. Evaluate is the heart of the policy assembly. The check-in framework executes this method when the user clicks the Policies button or attempts a check-in or shelving operation. If Evaluate returns a non-empty list of PolicyFailure instances, the framework cancels the check-in and presents the list of errors. If you double-click on an error message, the framework calls Activate, allowing the policy class to display details about the error. Finally, if you press F1 with an error selected, the framework executes the DisplayHelp method, which can display a help file, navigate to a Web page, or present a custom UI. The policy class uses the PolicyStateChanged event to notify the framework that changes have occurred and that it should call Evaluate again. Figure 6 provides the initial implementation for IPolicyEvaluation.
The initial implementation is very straightforward—the policy instance stores a reference to the IPendingCheckin reference provided via the Initialize method. In the Evaluate method, the code enumerates the CheckedPendingChanges collection, retrieving a PendingChange instance for each checked item. If the item is a file that ends with either a .vb or .cs extension, the code loads the file contents into a string variable using a StreamReader. Then the code scans the file contents using the String.Contains method for each bad word, one at a time. If the code finds a bad word, it creates a new PolicyFailure instance, adds it to the failures List(Of T) collection, and continues to the next pending change. Once it has scanned all the files, it returns the failures collection to the policy framework that invoked Evaluate.
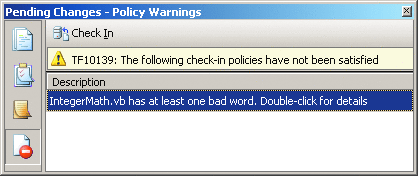
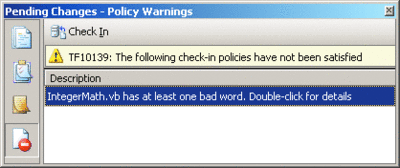
After you have added the necessary code to support IPolicyEvaluation, you need to compile the assembly. You have to add the necessary data to the registry so Visual Studio will load the assembly when you click the Add button in the Source Code Control Settings dialog. Whenever you modify the list of installed policies, you'll need to restart any running instances of Visual Studio so that it will see the changes. Once you have everything configured, turn on the policy and then modify a file under source control, entering a bad word. Then, open the Pending Changes dialog and click the Policy Warnings button or attempt a check-in. You should see something similar to Figure 7.
Debugging the custom policy is actually quite easy. First, if you've enabled your custom policy, remove it from your Team Project list. You'll make your life much easier if you only work with your policy assembly in a private Team Project. Naturally, at some point you'll want to test your policy assembly with any other policies you choose to enable, but reducing the problem surface area when you're debugging just makes sense. Once you've removed all policies, shut down all running instances of Visual Studio 2005 and leave the data you added earlier in the registry. Then, restart one instance of Visual Studio 2005. Load your custom policy project and access the Project designer (right-click on your Project in the Solution Explorer and select Properties). Activate the Debug tab and change the Start Action to Start External Program. You'll need to provide the fully qualified path to Visual Studio 2005, typically C:\Program Files\Microsoft Visual Studio 8\Common7\IDE\devenv.exe. Save your changes and close the designer.
Once you've done this, set breakpoints on IPolicyDefinition.Type and IPolicyEvaluate.Evaluate. Start debugging by pressing F5 or by choosing Debug | Start Debugging from the menu. A second instance of Visual Studio will start and, in this instance, open the project you're using to test for bad words. Then access the Source Control Settings dialog and add your custom policy. When you click the Add button, the first instance of Visual Studio will become the active window as Visual Studio accesses the Type property of your policy. When you close the settings dialog, the policy framework will execute your policy's Evaluate method, which should, in turn, reactivate the first instance of Visual Studio and allow you to start debugging. At the end of the debugging session, return to the Source Control Settings dialog and remove your policy. You will have a chance to debug your IDisposable implementation here.
When you're finished, close the second instance of Visual Studio. At this point, you can modify your policy assembly and repeat the process. You should only enable the policy in the second instance of Visual Studio. Otherwise, you'll need to unload all instances to recompile.
While the current implementation of the custom policy works, it's not very feature-rich. It doesn't provide any details about where the bad words are located. In addition, you've hardcoded the list of bad words. To rectify this, you'll first need to supply a richer implementation for IPolicyEvaluate.Evaluate. Then you can provide an actual implementation for the Activate method. Finally, you'll need to supply an implementation for IPolicyDefinition.Edit. Figure 8 provides the new code for Evaluate.
The new implementation of Evaluate uses a set of new helper classes, shown in Figure 9. WordInfo stores both the line number and actual line of code containing the bad word. The code creates an instance of WordInfo for each bad word. CheckedFileInfo contains the name of the file checked, a collection of WordInfo objects, and a reference to the PendingChange item. Finally, BadWordPolicyFailure, which derives from PolicyFailure, holds a reference to an instance of CheckedFileInfo. This class exists because the default PolicyFailure class does not provide an easy way to associate a policy failure with supporting metadata that the Activate method needs to provide a rich user experience.
With these new classes, the new Evaluate method works slightly differently. The code still enumerates the CheckedPendingChanges collection, looking for only .vb and .cs files. However, the GetWordInfo helper method does the work of actually loading the source file and looking for bad words. This method builds a collection containing a WordInfo for each bad word on this list. If GetWordInfo finds at least one bad word, the Evaluate method creates an instance of CheckedFileInfo and passes it to a new instance of BadWordPolicyFailure, which is added to the failures collection. Then it continues checking each file.
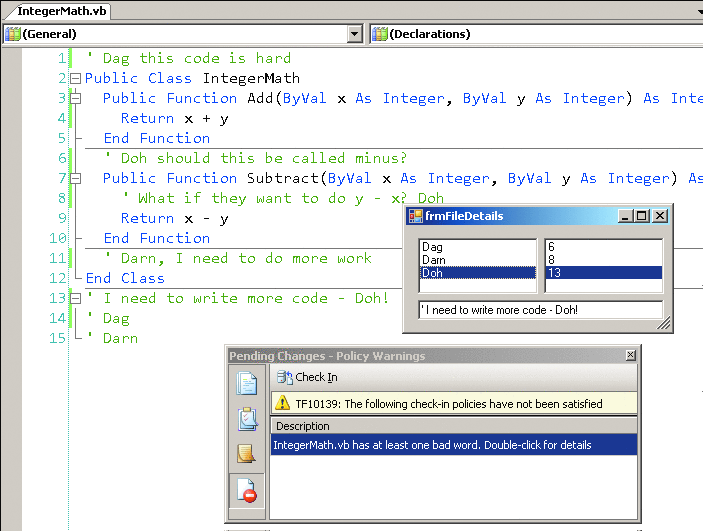
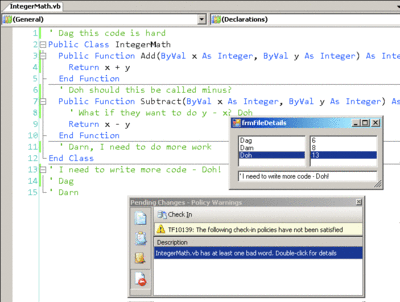
Next, you need to provide an implementation for the Activate method. When you double-click on a policy violation message, you want the policy to display a dialog listing the bad words, what lines they occur on, and the actual line of code with the bad word. The sample code download provides a simple form, frmFileDetails, to get you started.
In Figure 10 you can see the new code for the Activate method. The first thing the code does is TryCast the provided PolicyFailure reference to the derived BadWordPolicyFailure type. If this succeeds, the code displays frmFileDetails as a dialog (see Figure 11 for an example).
The last feature you need to add is a dialog that allows the Project Administrator to define the list of bad words. There are three tasks for you to complete here. First, you need to provide a storage mechanism for the list of bad words. Next, you must provide a UI to edit the list of bad words. Finally, you need to modify the policy to load the bad words from the storage location instead of using the hardcoded array. None of these tasks is specific to policy assemblies—they're all just standard code. I've provided an implementation in the code sample. The sample stores the list of bad words in a text file located in the same directory as the add-in. At edit time, the Project Administrator must have read/write access to the bad-words file, though consumers of the policy will only need read access.
At this point, you should feel comfortable with check-in notes and policies. The framework Microsoft has provided for check-in policies is rich and flexible. Going forward, I look for Microsoft to improve the installation experience. In the next edition of this column, I'll dig into how to programmatically work with check-in notes and policies from custom code and the Word add-in.
Send your questions and comments to mmvsts@microsoft.com.