Advanced Basics
TableLayoutPanels
Ken Getz
Code download available at: AdvancedBasics2006_12.exe (169 KB)
Browse the Code Online

I've been writing quite a bit of courseware lately, and many of the demos for the courses require the presenter to step through a number of simple procedures, demonstrating various features of Visual Studio® or the Microsoft® .NET Framework. For example, I recently worked on a course in which the demos ran as console applications. The students saw a menu with lettered prompts, and by pressing a letter (A through Z), the demo ran the appropriate sample procedure.
On a long plane trip home one day, I crafted a simple menuing system that allowed the courseware author (generally, me) to supply a list of objects containing prompts and a delegate instance that indicates the procedure to run when the user selects the item. The code lays out the menu, even breaking the list into two columns if it gets too tall. It worked flawlessly, and I never thought about how to display a demo's menu again.
Now that I'm back to creating Windows®-based applications for demos, I thought it might be nice to have the same sort of self-generating demo system in place. The current course (and almost every conference talk I give) requires a large number of demo applications, and not having to lay out the main switchboard form for each application can save time. It's a lot simpler to modify a single line of code than it is to manage laying out the main form.
With this goal, I put together a demo-creation system for Windows-based applications and it's the basis for this month's column. Figure 1 shows sample code that can be used to generate the switchboard in Figure 2.
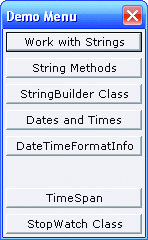
Figure 2 Menu
If you want your menu to display its items in more than one column, you can change the MaxItemsInSingleColumn property of the DemoMenu class. For example, if you change the property value to 4 (its default value is 10), the same form shown previously displays its buttons as you see in Figure 3.
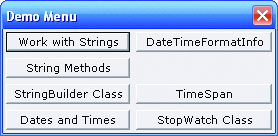
Figure 3 Menu Items in Columns
For use in courseware, I include the DemoMenu project along with the course samples, and have each demo refer to the compiled DemoMenu assembly in a known location. You can deploy this assembly as you deploy any other shared assembly-but that's a topic for a different column.
The DemoMenu class creates an internal list of objects that maintain the prompt text and the address of the procedure to be called by each button click. The code creates a new form, lays out the buttons, and hooks up the Click event handlers. My first attempt at writing this code (on the Boston-to-Minneapolis leg of my trip back to the West Coast) simply created buttons on a form. I used an internal offset value to space the controls on the form, and I didn't add support for multiple columns. During the layover, it occurred to me that multiple columns would be nice, and as soon as I got back on the plane again, I realized that laying the controls out manually was too much effort. The answer was obvious-the TableLayoutPanel control, new in the Microsoft® .NET Framework 2.0, makes this sort of thing relatively simple.
Using the TableLayoutPanel Control
The TableLayoutPanel control is the most advanced, and the most complex, of the set of container controls that you'll find in Windows Forms 2.0. (This set also includes the Panel, SplitContainer, TabControl, and FlowLayoutPanel controls.) This control allows you to arrange other controls in a grid-like fashion, with a fixed number of rows and columns. This control is richer than I can begin to demonstrate here, and its capabilities far outstrip the needs of the simple switchboard form. In this example, the TableLayoutPanel control provides one important function: it creates neatly spaced, multi-columned cells in which the code can place buttons. The code doesn't need to worry about aligning cells, or laying out the spacing-the TableLayoutPanel control does that formatting. (You may find it useful, before digging into this column, to create a simple form with a TableLayoutPanel control on it. Try working with the various user interface features of the control. Add rows and columns, place controls within cells, set the height of rows and the widths of columns, and try out the various sizing options.)
Because the sample project doesn't load its own form as it starts up (it calls the DemoMenu class's DisplayMenu procedure to display the main menu), the project doesn't use a startup form, as do most Visual Basic®-based applications. Instead, this application starts from a Sub named Main. In order to make this possible, the sample project, TestDemoMenu, disables the standard application framework, and sets the Startup object option to Sub Main, as shown in Figure 4.
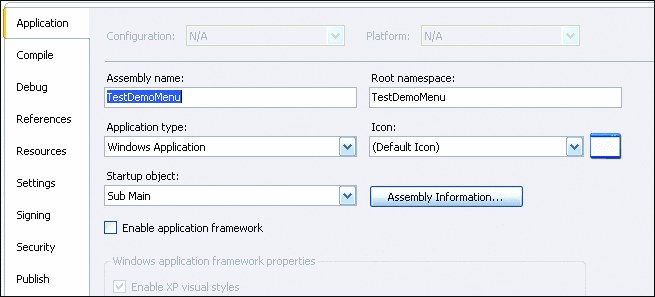
Figure 4 Disable the App Framework to Start from Sub Main
The sample application includes a reference to the DemoMenu project, which includes the DemoMenu class. In order to use the DemoMenu class, you start by creating an instance, and then adding items to the menu by specifying text for each button, along with an instance of the EventHandler delegate to be called by the menu when you click each button:
Dim menu As New DemoMenu
menu.Add("Work with Strings", AddressOf WorkWithStrings)
menu.Add("String Methods", AddressOf StringMethods)
' and so on...
If you want to insert an empty space within the list of demo buttons, you can add an empty item:
menu.Add("", Nothing)
(If you'd like, you can also create your own List of DemoItem objects, and assign this list to the MenuItems property of the DemoMenu instance. Most of the time, however, it's easiest to just call the Add method to create each individual item.)
You can also set any of the public properties of the DemoMenu class, including the Font, MaxItemsInSingleColumn, Text (of the menu form), or Form (this allows you to supply your own form on which to place the buttons, which you'll need to do before you call the DemoMenu.DisplayMenu method). The sample project includes this code to complete laying out the form before it calls the DisplayMenu method (setting the form's Text property in its call to DisplayMenu):
menu.Font = New Font("Verdana", 8, FontStyle.Regular)
menu.MaxItemsInSingleColumn = 4
menu.DisplayMenu("Demo Menu")
The DemoItem class describes the contents of each demo item, as shown here:
Public Class DemoItem
  Public ItemText As String
  Public ItemProc As EventHandler

  Friend Sub New(ByVal ItemText As String, _
      ByVal ItemProc As EventHandler)
    Me.ItemText = ItemText
    Me.ItemProc = ItemProc
  End Sub
End Class
Note that the DemoItem.ItemProc property contains an EventHandler delegate instance. This delegate type corresponds to the type required for the Button class's Click event handler. If you attempt to set any other type of delegate for the ItemProc property, your code won't compile-that's the point.
The DemoMenu class includes two private variables, along with two public fields:
Private Shared formCount As Integer = 0
Private frm As Form

Public MenuItems As New List(Of DemoItem)
Public MaxItemsInSingleColumn As Integer = 10
The shared formCount variable allows the class to provide unique behavior for the first instance of this class within a running application-you'll see more about this when you investigate the code in the class. The MenuItems variable contains the list of menu items (you can set this directly, if you like), and the variable frm maintains a reference to the form containing the buttons. Finally, the public MaxItemsInSingleColumn field allows the caller to override the default behavior, which, as you saw, allows up to 10 items in a vertical column on the form.
The class's constructor simply sets up the default form:
Public Sub New()
  ' Set up the default form
  frm = New Form
  frm.Font = New Font("Verdana", 10)
  frm.Text = "Main Menu"
  frm.FormBorderStyle = FormBorderStyle.FixedDialog
  frm.MaximizeBox = False
  frm.MinimizeBox = False
End Sub
The Add method provides support for adding menu items to the data structure that maintains the menu items:
Public Sub Add(ByVal itemText As String, ByVal itemProc As EventHandler)
  Dim item As New DemoItem(itemText, itemProc)
  MenuItems.Add(item)
End Sub
In addition, the DemoMenu class provides three simple property procedures for the Form, Font, and Text properties, for getting and setting the form reference, as well as for properties of the default form.
In the class, you'll find an override for the DisplayMenu procedure that accepts a caption for the form, and then calls the full DisplayMenu procedure:
Public Sub DisplayMenu(ByVal Text As String)
  Me.Text = Text
  DisplayMenu()
End Sub
Helper Procedures
Before examining the main DisplayMenu procedure, it's important to understand how each of its support procedures works. The CalculateDimensions procedure calculates how to break the demo items into multiple columns, attempting to minimize the number of columns given the value for MaxItemsInSingleColumn. The procedure (shown in Figure 5) allows a maximum of five columns-if it can't fit the number of demo items you've created into five columns, it simply raises an exception and quits. (You'll know the first time you run the demo if it's going to fail, at which time you can rethink the number of items to display on the main menu. Note that you can have a button on the menu display another dynamically generated menu, so the column limitation isn't terribly onerous.)
The CalculateDimensions procedure is passed an integer containing the total number of items to be displayed. It checks to see if the total number is less than the largest number per column and if so you're finished.
Once the procedure determines that it must calculate the number of columns, it looks for numbers of rows and columns that fit the number of items it must display, minimizing the number of columns. If it is unable to find an appropriate combination of rows and columns, it raises an exception back to the caller. The procedure completes by returning a new Size instance containing the numbers of rows and columns.
Given that the list of items is a one-dimensional array, but you may be working with buttons in a two-dimensional layout, much of the remainder of the code handles moving items into a set of two-dimensional data structures. The ArrangeItems procedure (see the code in Figure 6) takes items from the original list and returns a two-dimensional array of DemoItem instances, ready for use by other procedures.
The ArrangeItems procedure starts by creating the output array. Note that because the buttons descend columns first, all the array access uses columns first (unlike most array processing, which is row by column). The code keeps track of the current item, loops through all the columns and rows, and copies references from the original List of items into the new array. As it's looping, the code checks to make sure it hasn't run out of items. Finally, the procedure returns the new array.
In order to make sure the buttons are wide enough to display their text, the code must calculate the size of the text on the buttons in the font of the form. In addition, the DemoMenu class attempts to allow different columns of buttons to have different widths. To make this possible, the CalcSizes procedure (shown in Figure 7) creates an array of SizeF structures, one for each column in the form.
The CalcSizes method first creates the output array. Next, the code asks the form to create a Graphics object to perform the font size calculations. The code loops through each column, initializing a temporary SizeF structure and then looping through each row in the column. Inside the loop, the code will calculate the size of the text for each button and store the maximum size required in each column. Once it's finished with each column, the code stores the maximum size in the array of sizes.
For each row, the code retrieves the menu item and calculates its size, using the form's font. The Graphics.MeasureString method does the work. Given the maximum size, the outer loop can store the SizeF structure for each column, for later use.
The FillTable procedure (see Figure 8) creates the actual buttons and hooks up their event handlers within the TableLayoutPanel control. This procedure loops through all the columns and rows, and if the item in the array of items isn't Nothing, checks the item's ItemText property. If it's not an empty string, the code creates a button; otherwise, it leaves blank the position within the TableLayoutPanel control. If the code determines that it needs to create a button, it creates the control, sets its properties, hooks up its event handler, and adds the control to the appropriate location within the TableLayoutPanel control.
The SetupPanel procedure creates the TableLayoutPanel control and sets its row heights and column widths (see Figure 9). It starts by creating TableLayoutPanel, docking it, setting the rows and columns, and clearing the default collections of row and column styles. In this control, it's the RowStyles and ColumnStyles properties that determine the behavior of the control. A row or column can have a fixed size, a percent size (that is, a percentage of the available space in the control), or it can be automatically sized (based on the contents of the row or column). For this app, the rows need to be of equal height and each column needs to be a distinct fixed width. In addition, the form must conform to the size of the TableLayoutPanel control's contents, so this procedure needs to calculate the size of the contents of the control.
The code continues by setting up variables to track the total width and height of the table, along with variables to track the height and width of individual rows and columns. The code loops through all the rows, setting each to the height of the first row of text. Because all the buttons use the same font, they all fit within the same height. This code multiplies the height by a factor of 1.8, allowing room for space above and below the text on each button. Within the loop, the code sums up the heights and stores the values in the totalHeight variable.
The next block of code sets the width of each column, multiplied by an arbitrary factor of 1.2, giving room on either side of the text on the button. This code sums up the widths of all the columns in the totalWidth variable. The procedure finishes up by clearing any existing controls from the form, adding the TableLayoutPanel control to the form, setting the size of the form, and returning the TableLayoutPanel control to the caller.
The Display Menu Procedure
Given all these helper procedures, the DisplayMenu procedure doesn't have much work to do (see Figure 10). This procedure starts by calculating the dimensions of the table, calling the CalculateDimensions procedure shown earlier. The code continues by setting up temporary data structures containing the menu items in a two-dimensional structure and an array of column widths. The code creates, configures, and fills the TableLayoutPanel control. Finally, the code displays the form. If this is the first form in the application, the code must call the Application.Run method, but for further instances of the class the code simply needs to display the form. In order to make this possible, the code maintains a shared variable, formCount, which tracks the number of instances of the form that have been created. If the value is 1, the code calls Application.Run; otherwise, it calls the ShowDialog method of the form.
Using the TableLayoutPanel control in this way, the DemoMenu class can lay out its buttons in one or more columns without requiring you to perform exacting location calculations. You set the widths and heights of the columns and rows, and the TableLayoutPanel control does the rest. All you need to do is supply the list of DemoItem instances, either by creating the list yourself or (as shown here) calling the DemoMenu.Add method to add each item to the list. You supply the text of the button and the procedure you want to call when you click the button, and the DemoMenu class does the rest.
I can think of several ways in which you could extend this demonstration. You could support reading the menu items from a configuration file so that you could make changes to the application without recompiling it. You could add support for different control types besides buttons, and you could add behavior that would allow the TableLayoutPanel control to display within a container on the menu form. I'm sure I'll continue to enhance this functionality, so stay tuned. In the meantime, if I keep writing courseware and conference demos at the rate I've been going, this assembly will save me a ton of time. I'm sure it will save you time as well.
Send your questions and comments to basics@microsoft.com.
Ken Getz is a senior consultant with MCW Technologies, and a courseware author for AppDev (www.appdev.com). He is coauthor of ASP.NET Developers Jumpstart (Addison-Wesley, 2002), Access Developer's Handbook (Sybex, 2002), and VBA Developer's Handbook, 2nd Edition (Sybex, 2001). Reach him at keng@mcwtech.com.